WordPress does so many things extremely well. But, it does not empower you to effectively prepare images for online use. Here’s how to prepare your images prior to uploading them into the WordPress Media Library.
PaintShop Pro for Windows
For my Windows clients, I recommend PaintShop Pro for easy image editing.
Pixelmator & ImageOptim for Mac
For my Mac platform clients, I recommend using Pixelmator for image editing and ImageOptim for image file compression.
This post focuses on Mac solutions: Pixelmator and ImageOptim.
As the Internet has evolved with new social media apps like Pinterest and Instagram, along with the luxury of increased bandwidth and server storage, imagery and even videos have become increasingly more important. Today, you can take beautiful photos with a device as convenient as your cell phone! But, preparing these images for your website requires a little effort.
What to Consider – Dimensions & File Size
Size Matters
On the Internet, size matters—we’re talking about two sizes:
- Image File Size measured in kb or Mb (kilobytes or Megabytes)
- Image Dimensions measured in px (pixels)
Example Image
I downloaded a stock image for this website. The image I downloaded is:
- Image File Size: 17.2Mb
- Image File Dimensions: 6016px x 4000px
Before you can see any image on a website, your devise (your laptop, tablet, or cellphone) must download it. A slideshow with 5 images therefore requires using a significant quantity of a user’s data—and the larger the file sizes, the longer the images take to download. We don’t want to waste people’s time (as they wait for the images on a page to download) or money (their cellphone data costs money monthly).
The two measurements above are linked—the larger the image dimensions, the larger the file size. So, the key is to balance the two in order to display an image that looks clear and professional without taking up too much server space or using up too much of your visitor’s precious data when they download it onto their laptop of phone.
Preparing your Image in Pixelmator
Adjust & Crop
1. You may choose to adjust your image in various ways. You may also want to crop the image to remove extraneous details or focus on a particular area.
Resize
2. Now, consider how much space your image will take at its largest on any screen (computer screen, tablet, phone). Adjust size to the maximum required.
Save As & Compress
3. Save the image in the format and resolution that will best compress the file size.
4. Further compress the image using ImageOptim.
1. ADJUSTING and CROPPING your Image in Pixelmator
ADJUST: You may choose to adjust your image in various ways, including flipping it, changing it from colour to black & white, adjusting brightness, etc. etc.
CROP: You may choose to crop the image in order to remove extraneous details from the outside and focus in on one area. Use the Crop tool and select the area you want to keep. Double click on the image to complete the cut.
2. RE-SIZING your Image in Pixelmator
For large slideshow images that will use a lot of computer screen real estate, you may require an image that is 1200px wide. For a small image in a sidebar, 400px wide may suffice. You can resize your image according to where you intend to use it. Keep in mind that on mobile and tablet responsive websites, the image will often display larger in a tablet that on the computer screen, based on how the sections of the page “stack”.
To resize the image in Pixelmator:
- On the top menu, click on Image > Image Size.
- In the Width box, choose your width. (I chose 1100 pixels for this image.)
- The Height will change automatically to maintain the same dimensions.
- Click on Okay.
3. SAVING your Image in Pixelmator
You can save images in different file formats depending upon your needs.
- PNG file: use this format when you require a transparent background.
- JPG file: use this format when you do not require a transparent background. This file format compresses most efficiently.
To save your file in Pixelmator:
- On the top menu, click on File > Save.
- File Format: Note that Pixelmator will automatically save the file in its native .pxm format unless you instruct it otherwise.
- Select the folder in which you want to save your file.
- Below the folder box, check the little box beside “Save copy as“.
- Choose your file format: JPEG.
- Then, adjust the quality on the quality bar. This part is important because it empowers you to limit the file size. I usually choose the second last bar from the right. You are completing a balancing act here between image quality and file size. And you may have to save the file several times in order to adequately limit the file size. (You typically want to limit the file size to under 300kb for any Webpage.)
4. COMPRESSING your Image in ImageOptim
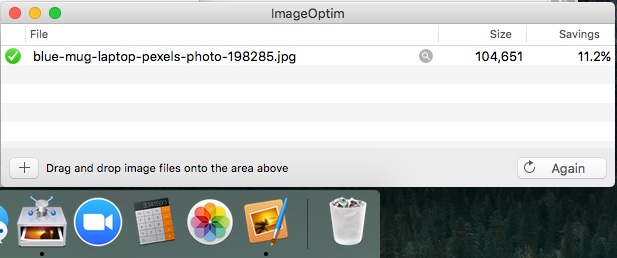
As a final step, I use a separate little program called ImageOptim to further compress all images.
To compress an image with ImageOptim:
- Simply drag the image from your Finder Folder onto the ImageOptim icon on your screen.
- In the pop-up window, observe how how well ImageOptim has further reduced your file size!

